Table of Contents
Lead Conversion
Once a business opportunity emerges, the Lead can be converted to a Opportunity. At this time, the data contained within the lead are automatically split out into a contact and an organization and the Lead is deleted. Information about the specific business opportunity is stored as an Opportunity. All the information collected for the Lead is still available but is now split between Contacts, Organizations and Opportunities.
Field Mapping
Create field on Contacts

Create field on Leads, with the exact same name and value

Access the mapping link in Settings

Establish the relation between the fields

Lead Field Mapping
In general, the assignment of copying one field from the Lead to another field on another module will be restricted to fields of the same type and smaller length. So you will only be able to map an email field on the Lead to an email field on Accounts, Contacts or Potentials.
There are two exceptions:
- text fields: you will be able to map a text field on Leads to a text field on another module ONLY if the length of the field on Leads is SMALLER than the length of the destination field. If we permitted the contrary you could potentially lose information.
- picklists: you will be able to map a picklist to another picklist or a text field and there will be NO validation done. It will be your responsibility to assure that:
- both picklists have the same values or
- the destination text field has enough characters to hold the longest picklist value
How to change the length of a text field
It is a typical situation to have created two custom fields, one on the Leads module and the other on another module and then want to assign values from one to the other, but it turns out that both fields were created with different sizes and the smaller one is on the destination module, so the application won't permit the mapping.
To solve this situation we have two options.
1.- Eliminate the destination custom field and create it again with the correct size. The problem with this option is that ALL data in the field you are deleting WILL BE LOST. So you can only do this if you still haven't saved any information in that field.
2.- Change the size of the destination field directly in the database. Let's look at how that would be done.
The size of a custom field is saved in two places, the vtiger_field table and the destination module's custom field table, so we have to change it in both places.
First we need to know the name of the field. If you are on a coreBOS release after September 2016 you can go to the field's property box in the layout editor. You will see the name of the column in the title. If not, go to the edit form of the module, right click on the field's input box and look for the “name” property. Let's suppose the field we want to change is called cf_891
Open phpmyadmin or adminer to access the coreBOS database. Navigate to the vtiger_field table and search the columnname for the field name we found, cf_891 in our case.
Navigate to the typeofdata column. You will see that there is a number there reflecting the size of the field. Let's suppose that our custom text field cf_891 has a length of 10 characters. We will see that the column has this value:
V~O~LE~10
or
V~M~LE~10
depending on if the field is mandatory or not. That 10 is the first change we need to make. Let's suppose we want to have a length of 20. We will edit the column and set it to:
V~O~LE~20
The row that is found contains the information we need to make the second change. Look in the column tablename, there is the name of the table that holds the real value of the field. Let's suppose that our cf_891 custom field belongs to the Accounts module. We will see that the column tablename has a value of vtiger_accountscf. So we navigate to the vtiger_accountscf table and go to the structure of the table. We will see that the cf_891 has been defined as VARCHAR(10), we must ALTER that definition to VARCHAR(20)
Both phpmyadmin and adminer will permit you to do that change in the graphical interface but in the end the necessary SQL will look something like this:
ALTER TABLE vtiger_accountscf CHANGE cf_891 cf_891 VARCHAR(20) NULL
After those two changes you should be able reload the Lead mapping screen and do the assignment you need.
Controlling Conversion Options
Most options in the conversion screen can be configured through the application. The full conversion screen has the options that can be seen in the next image:

- If the Accounts/Organization module is not active (that would be a B2C setup) the whole block of organization will not appear and neither will this module be an option below in the “Transfer records to” section.
- If Accounts is active, the block will appear, the organization name is mandatory
- If the Industry field is not active in the Accounts module, it will not appear in the conversion screen
- If the Potentials module is not active the whole potentials section will not appear
- If any of the fields shown the above screen shot are hidden in the Potentials module they will not appear in the conversion popup.
- If the Contacts module is not active (that would be a B2B or normal setup) the whole block of contacts will not appear and neither will this module be an option below in the “Transfer records to” section.
- If Contacts is active, the block will appear, the contact last name is mandatory
- The other two available fields for contacts will not appear if they are hidden in that module.
- Groups will only appear if they exist.
- Additional fields cannot be added to the screen without programming
Lead Conversion Options Explanation
Then I go to any Lead but the Convert Lead action is not there. Why?
I can only see the link if I activate see and use all, but then I also see al the modules, which I do not want.
I just tried and it worked correctly for me.
The problem must be with some field the conversion needs.
I had a look at the code and it says that the “Convert Lead” action will be visible when all these conditions are met:
- the user has edit permission on Accounts, Contacts and Leads
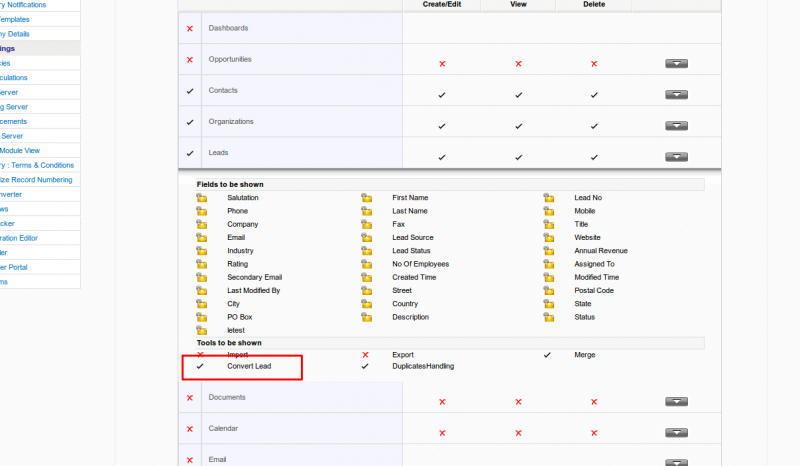
- the user must have conversion tool permission in his profile (see image below)
- Accounts and Contacts modules are active
- the Lead hasn't been converted previously
- the field “Company” on the lead is not empty
Creating Additional Records In Other Modules
In occasions it could be required to create records in other modules upon conversion of the lead. In this case coreBOS relies on the Business Mappings infrastructure to know what needs to be done.
It will look for a Module Set Mapping called LeadConversion which will contain the set of modules for which we need to create additional records. Then, for each module in this set it will look for a Field Mapping Business Mapping to get the correspondence of fields to be copied into the new record.
The field mapping process is accumulative in order of the modules found in the LeadConversion set. So you will be able to map fields from any module previously converted into the new record being created.
For example, let's suppose that we need to create a Project and a Project Task upon the conversion of a Lead.
We will create a Module Set Mapping called LeadConversion like this:
<map>
     <modules>
        <module>Project</module>
 	<module>ProjectTask</module>
     </modules>
 </map>
With that coreBOS knows that it must create a Project and a ProjectTask record when a Lead is converted. Now it needs to know what field value it must fill in to create those records. First it will create a Project, so it will look for Field Mapping Business Mappings and apply them in this order:
- Leads2Project
- Accounts2Project (if an account was created)
- Contacts2Project (if a contact was created)
- Potentials2Project (if a potential was created)
Once the Project record has been created, it will proceed to create the ProjectTask looking for these mappings:
- Leads2ProjectTask
- Accounts2ProjectTask (if an account was created)
- Contacts2ProjectTask (if a contact was created)
- Potentials2ProjectTask (if a potential was created)
- Project2ProjectTask
Leads, Accounts, Contacts, Potentials and Users will be ignored if they are found in the Module Set Mapping
Remember to map ALL the mandatory fields. Don't forget the assigned_user_id !!
As an example these are the mappings I created while testing this functionality which implement a very reduced case of the explanation above: creating a Project and ProjectTask.
LeadConversion
<map>
     <modules>
        <module>Project</module>
 	<module>ProjectTask</module>
     </modules>
 </map>
Leads2Project
<map>
  <originmodule>
    <originname>Leads</originname>
  </originmodule>
  <targetmodule>
    <targetname>Project</targetname>
  </targetmodule>
  <fields>
    <field>
      <fieldname>projectname</fieldname>
      <Orgfields>
        <Orgfield>
          <OrgfieldName>firstname</OrgfieldName>
        </Orgfield>
        <Orgfield>
          <OrgfieldName>lastname</OrgfieldName>
        </Orgfield>
        <delimiter> </delimiter>
      </Orgfields>
    </field>
  </fields>
</map>
Accounts2Project
<map>
  <originmodule>
    <originname>Accounts</originname>
  </originmodule>
  <targetmodule>
    <targetname>Project</targetname>
  </targetmodule>
  <fields>
    <field>
      <fieldname>linktoaccountscontacts</fieldname>
      <Orgfields>
        <Orgfield>
          <OrgfieldName>record_id</OrgfieldName>
        </Orgfield>
      </Orgfields>
    </field>
    <field>
      <fieldname>assigned_user_id</fieldname>
      <Orgfields>
        <Orgfield>
          <OrgfieldName>assigned_user_id</OrgfieldName>
        </Orgfield>
      </Orgfields>
    </field>
  </fields>
</map>
Potentials2Project
<map>
  <originmodule>
    <originname>Potentials</originname>
  </originmodule>
  <targetmodule>
    <targetname>Project</targetname>
  </targetmodule>
  <fields>
    <field>
      <fieldname>targetenddate</fieldname>
      <Orgfields>
        <Orgfield>
          <OrgfieldName>closingdate</OrgfieldName>
        </Orgfield>
      </Orgfields>
    </field>
  </fields>
</map>
Project2ProjectTask
<map>
  <originmodule>
    <originname>Project</originname>
  </originmodule>
  <targetmodule>
    <targetname>ProjectTask</targetname>
  </targetmodule>
  <fields>
    <field>
      <fieldname>projectid</fieldname>
      <Orgfields>
        <Orgfield>
          <OrgfieldName>record_id</OrgfieldName>
        </Orgfield>
      </Orgfields>
    </field>
    <field>
      <fieldname>assigned_user_id</fieldname>
      <Orgfields>
        <Orgfield>
          <OrgfieldName>assigned_user_id</OrgfieldName>
        </Orgfield>
      </Orgfields>
    </field>
  </fields>
</map>
Potentials2ProjectTask
<map>
  <originmodule>
    <originname>Potentials</originname>
  </originmodule>
  <targetmodule>
    <targetname>ProjectTask</targetname>
  </targetmodule>
  <fields>
    <field>
      <fieldname>projecttaskname</fieldname>
      <Orgfields>
        <Orgfield>
          <OrgfieldName>potentialname</OrgfieldName>
        </Orgfield>
      </Orgfields>
    </field>
    <field>
      <fieldname>projecttaskprogress</fieldname>
      <Orgfields>
        <Orgfield>
          <OrgfieldName>probability</OrgfieldName>
        </Orgfield>
      </Orgfields>
    </field>
  </fields>
</map>