coreBOSCP - How to change form and view layout
First of all I have to say that I am not a designer, in fact I couldn't make this attractive for the life of me, so all you should get from this article is HOW you can change the layout of the fields in the coreBOSCP application, not a real nice three column layout change.
We can achieve a different layout for our detail view in two ways. One is adapting the CDetailView widget which is used and another is substituting this widget completely for a script of our own creation. I will show the first method and leave the second with a remark here on how it can be done. The second method is by creating a specific layout form where we can program any output that we need. This technique is the one used for the creation and update forms in the coreBOSCP application. We would change the CDetailView found in the _view.php script for a renderPartial call to our own specific formatting script as can be found in the creation view:
<?php echo $this->renderPartial('_form',
        array('model'=>$model,
            'fields'=>$fields,
            'uitypes'=>$uitypes,
            'legend'=>Yii::t('core','create')." $modname"
            )); ?>
CDetailView
The yii framework CDetailView constructs the layout of the given data model using a table and rows, putting every field of the record in an individual row. This widget gives us a simple way to change this table for any other html elements that we want. In this case I am going to change that table for an html list widget being each list item a field of the record we need to show. Then I will modify the CSS to manipulate the list to show in three columns. There are abundant examples of this type of work on the internet and many of these can be adapted in this way.
The coreBOSCP view that defines the Detail View is found in protected/views/vtentity/_view.php and contains this definition:
	$this->widget('zii.widgets.CDetailView', array(
		'data'=>$data,
		'attributes'=>$data->getDetailViewFields(),
		'cssFile'=>BASEURL.'/themes/'.Yii::app()->getTheme()->getName().'/css/list.css',
	));
Basically we define a CDetailView widget and give it the data model and formatting for the fields. We also define the CSS definition file that must be applied.
CDetailView gives us three variables to change the HTML elements it uses:
- tagName: indicates the top level HTML tag to use, in our case we use UL
- itemTemplate: the HTML to be generated for each field of the record
- itemCssClass: this array applies a different CSS class to each field in a cycle, in our case we need a different CSS class for each of our columns so we define three CSS classes
These properties are explained in the yii framework documentation.
The final code looks like this:
	$this->widget('zii.widgets.CDetailView', array(
		'data'=>$data,
		'attributes'=>$data->getDetailViewFields(),
		'tagName'=>'ul',
		'itemTemplate'=>"<li class=\"{class}\"><label>{label}</label>{value}</li>\n",
		'itemCssClass'=>array('col1','col2','col3'),
		'cssFile'=>BASEURL.'/themes/'.Yii::app()->getTheme()->getName().'/css/list.css',
	));
With that change CDetailView creates an HTML List instead of a Table. Now we need to define the CSS to layout that in three columns. We add that to the list.css file defined in the CDetailView definition.
	.view li{
		list-style:none;
		padding-bottom:8px;
		float:left;
		width:32%;
		height: 30px;
		color: #000;
		background: #E0E0E0;
		border: 2px outset #d7b9c9;
	}

	.view li label{
		font-weight: bold;
		width: 140px;
		float: left;
		text-align: right;
		margin-right: 0.7em;
		display: block;
	}
	.col3{
		clear: right;
	}
	.col1{
		clear: left;
	}
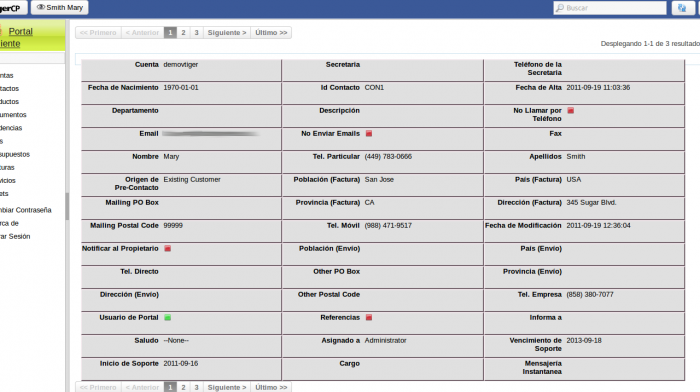
Here is a screenshot on how that looks: 
and here is the patch file with the changes above.
