This is an old revision of the document!
Table of Contents
Install coreBOS
Requirements
- Apache 2.x or above.
- MySQL 5.x
- PHP from 5.4.x to 7.0.x. PHP 7.x is recommended. PHP 5.3 will have some functionality missing but should work in general.
This is a typical WAMP/LAMP stack. All linux distributions have this natively so we recommend you install the packages from your distribution (make sure you have the right versions). On windows download the XAMPP stack from apache friends. You can see the list of application versions here.
MYSQL Requirements
Please make sure to review MySQL configuration (my.cnf or server start parameters)
| ENGINE=InnoDB | Should be available. (Turn off –skip-innodb) |
PHP Extensions
Following extensions should be enabled for your PHP setup
| GD | Mandatory | Charts and graphs generation are dependent on this library. |
| IMAP | Mandatory | Webmails Module is dependent on this library. |
| Zlib | Mandatory | Used for backups and module packaging among others |
| DOM (php-xml) | Mandatory | New dependency For coreBOS Updater |
| OpenSSL | Optional | Imap with OpenSSL should be enabled in case Mail server needs to be connected via SSL |
| Curl | Optional | This one is optional but really important for any external communications, like SMS, Google Sync or RSS |
PHP Configuration
Make sure to verify if your PHP configuration meets the recommended values.
| Variable | Value |
|---|---|
| allow_call_time_pass_reference | on |
| error_reporting | E_ERROR |
| safe_mode | off |
| display_errors | on |
| file_uploads | on |
| max_execution_time | 600 |
| max_input_vars | 8000 |
| post_max_size | 16M |
| memory_limit | 1024M |
| log_errors | off |
| output_buffering | on |
| register_globals | off |
| request_order | GP |
If you have the PHP Suhosin extension installed, this extension adds restrictions to make PHP more secure, but some of these restrictions break coreBOS.
To solve this problem you must change two variables in the suhosin config file: (normally: /etc/php5/conf/suhosin.ini)
suhosin.post.max_vars = 8000
suhosin.request.max_vars = 8000
After this you must restart your apache server.
For security reasons it is VERY important that you set the value of request_order to GP.
coreBOS barely uses cookies and it does not look for them in the $_REQUEST superglobal.
Most modern linux servers already set this value to GP by default so you are probably already covered but check just in case.
You can read a little more about this here.
File Permissions
Provide read-write access to the following files and folder (recursively):
Read and Write permissions should be enabled for user/group who owns webserver process (like www-data or httpd or apache).
- config.inc.php
- tabdata.php
- install.php
- cache
- storage/
- install/
- user_privileges/
- Smarty/cache/
- Smarty/templates_c/
- modules/Emails/templates/
- modules/
- cron/modules/
- test/vtlib/
- backup/
- Smarty/templates/modules/
- test/
- logs/
- modules/Webmails/tmp/
Please make sure you meet all these requirements
Install
- Download the source code from GitHub
- copy the code into a folder in accessible from your webserver install
- type in the URL of the folder into your browser
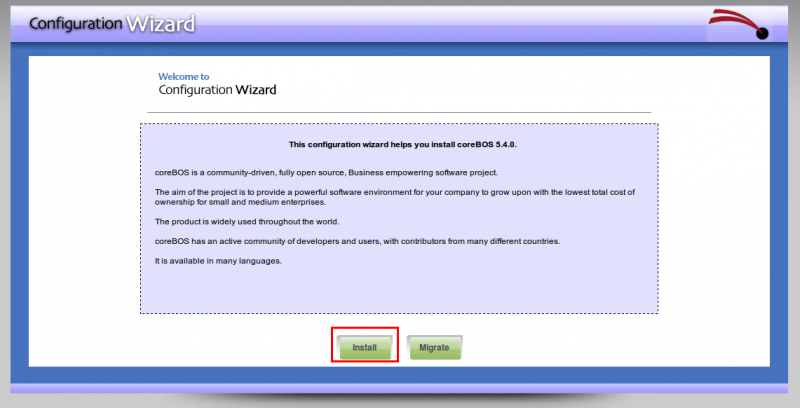
- you should get the Configuration Wizard welcome page
- click on the Install button and accept the license
- Review all the pre installation checks. You should be able to proceed with some PHP recommendations in red, but ONLY those, any other red check MUST be fixed before proceeding.
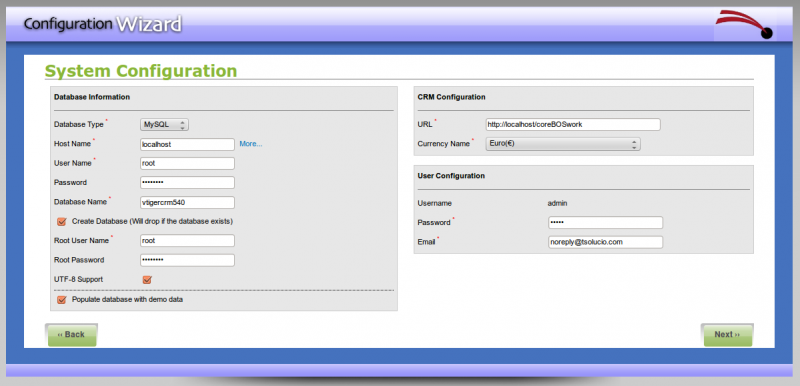
- Fill in all the information required and continue
- you will need a mysql user with access to a database that may exist or not, if it doesn't exist you will also need a mysql user with enough permission to create a database
If the database exists it MUST be empty, the install procedure DOES NOT migrate, there is a migration procedure available if necessary.
- you can choose the password for the only user that will be created.
- now wait for all the installation work to be done
- if all goes well you should receive a verification page welcoming you to the application
- press the Finish button to reach the login page
- execute the database changes, this is done using the coreBOS Updater, which is a module that will take care of managing all the updates from now on. It will read the set of changes that need to be done and will permit you to apply them and undo some of them.
- login to the application as the admin user and go to the “coreBOS Updater” module.
- click on the Get Updates button
- go back to the list view and click on the Apply All button
- Now comes all the fun: first configure the application and then create users to start


